Sunday, January 9, 2011

Sunday Snapshot - Let's go fly a kite!

Yesterday was the 10th annual Kite Festival on Lake Harriet. Every year I say I'm going to go but it always falls on a gymnastics meet weekend. This year I decided not to judge so many meets so I found myself free on festival day. yea! I convinced Lexi it would be fun and dragged her along for the ride.

It was around 10°F outside but the sun was shining. There wasn't much wind, which was great for walking around but not so much for kite flying. Eventually there were some kites in the air though. We had some hot cocoa and cider, roasted some marshmallows and watched some kids learn to ice fish. Maybe next year we'll fly kites too!
Marshmallow roasting on the boardwalk (in my Michelin man coat)

Early in the day, not so many kites. They looked so much bigger in person!

I loved this one!

Lexi on the ice, ready to learn to ice fish. Trying to take photos with my big mittens on I cut the photo off above her feet. I wanted to show her fabulous shoe decision. Just couldn't get her into a pair of boots for anything! At least she let me give her a hat. California girls ;-)

Sleigh rides looked fun too. Maybe next year we'll get to that too. So glad I finally made it to the festival! Who says you have to stay inside all winter?


Check out the great snapshots over at Ni Hao Y'all...

Ni Hao Y'all

Monday, January 3, 2011

Cooking Weekend - the last night

For all of the time I spent being lazy last weekend, I think I was still quite productive. The house is clean, laundry is done, tub is re-caulked, driveway is cleared and the freezer is bursting with lunches for a while. And even though sleeping in for me is only 8:30, it was very nice while it lasted. This morning's alarm was. not. cool. ugh. But, as I tell Riley each morning, I have to go to work or we'd have to live in the car and she doesn't like the car. Hi ho hi ho...

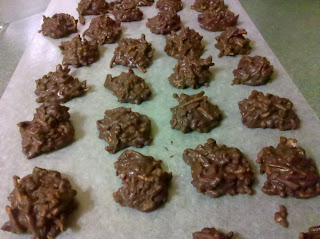
Yesterday marked the last of the recipes of the weekend. I made a second batch of the Chocolate Crunch cookies (with chow mein noodles this time) and they are now residing on the counter at work. Hopefully they will get eaten or I will end up eating them all! After the first batch of cookies, Riley and I went to indoor play time at the local dog training place. It was fun to watch the hyper puppies run around with each other. Riley however, is 11. And wanted nothing to do with them. We did some walking around and she ran for a bit but then she stared at the door and sighed. Yes, my dog actually sighs. Well it was fun for a bit anyway.

Next I was on to the Roasted Vegetables. I know it's really more of a side dish but I made so much of it I guess I'll be having them for lunch alone. So tasty though!
5 Herb Roasted Vegetables
(recipe origin unknown, handwritten recipe card from so far back I can't remember)

2 lb tiny new potatoes (I used fingerling instead, they were so pretty!)
3 medium carrots, cut small (to save time I used the baby carrots whole)
1 onion
--
2 tbsp snipped chives
1 tbsp snipped oregano
1 tbsp snipped italian parsley
2 tbsp snipped rosemary
1 tsp snipped sage
3 cloves garlic, minced
2 tbsp melted butter
2 tbsp olive oil
1/2 tsp salt
1/4 tsp pepper

Preheat oven to 400 degrees.
Spray 13 x 9" pan with cooking spray. Scrub and cut potatoes. Combine herbs, butter and olive oil in large bowl (or in extra large zip-seal bag). Add potatoes, carrots and onions, mix until evenly coated. Add mixture to pan. Sprinkle with salt and pepper. Cover with foil and bake for 30 minutes. Uncover, stir and bake for an additional 10-20 minutes until potatoes are tender.

I set the melted butter aside to cool slightly and found it a few hours later as I was cleaning up. Oops. Didn't seem to hurt too much although I bet the veggies would have had a bit more crispy to them if I'd remembered. Also I cooked mine almost an hour but I didn't cut the veggies very small. Smaller veggies, less time of course. One could easily add other veggies like squash and zucchini but I'm pretty simple when it comes to my veggies. Served with a spoonful of sour cream and it says comfort food to me.

The final recipe (cue the horns and trumpets fanfare) Linzertorte Thumbprint Cookies. I got this recipe from the ReadyMade magazine, which I highly recommend for all kinds of fun and kooky crafts and neat money saving ideas. I was looking for a good way to enjoy my sister's cinnamon jelly and this seemed to be the ticket.

1/3 cup hazelnuts, toasted and skins removed
1/4 cup powdered sugar
1 cup all-purpose flour
1-1/2 tsp unsweetened cocoa powder
1/2 tsp ground cinnamon
1/8 tsp ground cloves
1/2 cup butter, softened
2 tsp finely shredded lemon peel (peel from 1 lemon)
1/3 cup seedless red raspberry jam
Powdered sugar to top, optional

1. Preheat oven to 325°. Line cookie sheets with parchment paper and set aside.
2. In a food processor bowl combine hazelnuts and powdered sugar. Process until nuts are finely ground. In a small bowl combine flour, cocoa powder, cinnamon, and cloves.
3. In a medium bowl beat butter and lemon peel on medium to high speed for 30 seconds. Add the hazelnut-sugar mixture. Beat until mixture is combined. Beat in the flour mixture until combined.
4. Shape dough into 1-inch balls and place 2 inches apart on prepared baking sheet. Using your thumb, make an indentation in the center of each ball of dough.
5. Bake for 8 minutes, then remove from the oven and fill cookie centers with jam. Bake for 6 to 8 minutes more or until bottoms are light golden brown. Transfer to a wire rack and let cool. Sift powdered sugar over the tops of cookies, if desired. Place a single layer of filled cookies in an airtight container and store at room temperature for up to 3 days or freeze up to 3 months.

I'm not sure if I love these. And I'm not really sure what about them I would change to love them more. I do think I could have baked them the entire time with the jelly as it didn't seem like it got baked enough. Also, they baked for almost 10 minutes (instead of the recommended 6-8) with the jelly on and they still seem almost just done. In any case, I still ate them!

I realized after this weekend that most families cook meals every night. Being single, I have the luxury of being lazy about my food, thus this weekend was outside my reality. I don't eat out a lot but have been known to have PB&J or cereal for dinner. I also realized that when I am responsible for the health and nutrition of my little girl my gourmet (ha) ways will change. I promise I won't post every meal like I did this weekend :-)

Now back to our regular programming...

Sunday, January 2, 2011

Cooking Weekend night #3

I think yesterday's dishes are the winners so far this weekend! I took the Chocolate Crunch No-Bake Cookies to the neighbor's Rose Bowl party and brought a whole bunch of people back to the 70s with that classic recipe. Then I baked up the Blue Cheese Stuffed Chicken Breasts and it really did taste just like buffalo wings without the sticky fingers! While it isn't the lowest fat or calorie dish on the list, I'll hang on to the recipe and make it again for sure.

Chocolate Crunch No-Bake Cookies
(from a recipe card written in my 12-year old handwriting, circa late 1970s)
2 cups sugar
1/2 cup milk
1/2 cup butter

Mix together and bring to a boil for 1 minute (don't overboil). Remove from heat

6 heaping tbsp unsweetened cocoa
1 tsp vanilla
3 cups quick oatmeal
1/4 cup peanut butter

Mix together. Pour melted butter/sugar mixture over and stir until completely covered. Drop by teaspoons onto wax paper and let harden.

Variations include anything you like, really. Nuts or raisins or cranberries. The classic 70s version includes chow mein noodles. I'll be making a batch of those today.

Blue Cheese-Stuffed Chicken with Buffalo Sauce
(from Cooking Light magazine)
Note: I realized after I took the photo that although I thought to add rice as a side, my dinner was sadly lacking in vegetables. So I added some green beans. Pretend there's some kind of vegetable on the plate too...
Filling
1/2 cup crumbled blue cheese
1 tbsp reduced-fat sour cream
1 tsp fresh lemon juice
1/8 tsp freshly ground black pepper

Chicken
4 (6-oz) skinless, boneless chicken breast halves
1/4 cup all purpose flour
2 tbsp 2% reduced-fat milk
1 large egg, lightly beaten
1 cup panko
1-1/2 tbsp butter, divided

Sauce
6 tbsp finely chopped drained bottled roasted red peppers
2 tsp water
1 tsp Worcestershire sauce
1 tsp minced fresh garlic
1/2 tsp hot sauce

1. Preheat oven to 350°.
2. Combine first 4 ingredients in a small bowl. Cut a horizontal slit through thickest portion of each chicken breast half to form a pocket. Stuff cheese mixture evenly into pockets.
3. Place flour in a shallow dish. Combine milk and egg in a shallow dish, stirring well with a whisk. Place panko in a shallow dish. Working with 1 chicken breast half at a time, dredge chicken in flour, then dip in egg mixture; dredge in panko. Repeat with remaining chicken breast halves.
4. Heat a large ovenproof skillet over medium-high heat. Add 1 tablespoon butter to pan; swirl until butter melts. Arrange chicken in pan; cook 4 minutes or until browned. Turn chicken over; place skillet in oven. Bake at 350° for 20 minutes or until done.
5. While chicken bakes, combine remaining 1-1/2 teaspoons butter, bell peppers, water, Worcestershire sauce and garlic in a small saucepan over medium heat. Bring to a simmer; cook until butter melts. Remove from heat and stir in hot sauce. Serve sauce with chicken.

One good note from the magazine is not to turn the chicken over too soon or it will stick. I waited and it didn't stick at all. Also, I would follow the 'finely chopped' directions for the bell peppers. I got lazy and didn't process enough and I think it would have turned out better if it was a smoother sauce.

Now on to the thumbprint cookies and roasted veggies. Christmas decorations are almost all down and the Christmas New Year's cards are finally out. Riley scored an indoor play group session at the dog training place down the street so I'd better get cracking on the rest of my chores!

Saturday, January 1, 2011

Cooking Weekend night #2

With the chili all packed up and in the freezer, I was on to Stuffed Shells. I've made this recipe a few times and it's always tasty. This time I skimped on the feta because the packages came in 3/4c and giant sizes and I thought I could get away with a little less. Not as tasty without the right amount of feta, I will know next time!

The picture isn't great but it still tasted good! Now I've got more containers in the freezer for lunch! This recipe came from Cooking Light a few years ago. Serving size is 4 shells but I've always thought 3 was plenty. And at 2 WW points (not plus, just points) per shell that's not too bad!
Artichoke, Spinach and Feta Stuffed Shells

1 tsp dried oregano
1/4 cup chopped pepperoncini peppers
1 28-oz can fire roasted crushed tomatoes with added puree
1 8-oz can no-salt-added tomato sauce
1 cup (4 oz) shredded provolone cheese, divided
1 cup (4 oz) crumbled feta cheese
1/2 cup (4 oz) fat free cream cheese, softened
1/ tsp freshly ground black pepper
1 9-oz package frozen artichoke hearts, thawed and chopped
1 5-oz package frozen chopped spinach, thawed, drained and squeezed dry
2 garlic cloves, minced
20 cooked jumbo shell pasta
Cooking spray

1. Preheat oven to 375°.

2. Combine first 4 ingredients in a medium saucepan. Place over medium heat; cook 12 minutes or until slightly thick, stirring occasionally. Remove from heat; set aside.

3. Combine 1/2 cup provolone and the next 6 ingredients (through garlic) in a medium bowl. Spoon or pipe about 1/5 tbsp cheese mixture into each pasta shell; place stuffed shells in a 13x9-inch baking dish coated with cooking spray. Spoon tomato mixture over shells; sprinkle with remaining 1/2 cup provolone. Bake at 375° for 25 minutes or until thoroughly heated and cheese melts.

I have tried the bag/piping method each time I've made this recipe and always ended up with a spoon. The spinach gets too clumpy and it gets stuck. Then if you make the opening too big it shoots out too much. The spoon method seems to work just fine though.

Yea, stuffed shells! Tomorrow on to the chicken...